Welcome back to the progress of the guest bedroom transformation that I am doing as a guest participant in the Spring 2020 One Room Challenge. The past two weeks have been all about the faux denim walls and creating a DIY basket light fixture!
If you have missed any of the other posts, you can catch up here; Week 1 / Week 2 / Week 3 / Week 4.

Walls – The Plan
Now that the ceiling is complete, it is time to work my way down to the walls. My original vision was to paint the faux denim around the entire room. But after all the painting on the ceiling and the four coats, two coats of primer and two coats of base paint, it took to get the walls prepped for the faux denim walls technique; I was tired. I also liked the look of the bright white walls. I started with the wall behind the bed and was going to go from there.
This page may contain affiliate links, which means if you make a purchase, I may receive a small commission at NO extra cost to you. I only recommend brands and items that I use and trust. To learn more, read my disclosure policy here.
Walls – Faux Denim Walls Paint Technique
I followed the Pottery Barn Kids Denim Paint Technique and tips from Heathered Nest. It has been a while since I have attempted a faux denim walls paint technique on the walls. I figured it would be something different to try and get the look of denim or grasscloth on the walls.
Be aware that you will need several days to complete this process due to the paint dry time. For starters, the walls had to be the white base color. It took two coats of primer to cover the green walls, plus two layers of the base color, Sherwin Williams Snowbound in a matte finish.
Walls – Section Prep

Once the base color is dry, it is time to tape off the sections. To start, I taped off the ceiling, baseboards, and adjacent walls. Then I measured the length of the wall behind the bed and divided the wall into four equal sections. You divide the wall into sections to give yourself enough time to work with the fast-drying glaze and to provide the appearance of wallpaper sections on the wall. By doing this, it requires a two-day time frame to complete this technique. Draw a straight line using a level and a pencil. You paint every other panel and apply the tape on the right side of the pencil line accordingly.
Walls – Glaze Time

Once the wall is taped off, it is time to mix up the glaze. You will need a mixing bucket with a lid; I used a 2-quart bucket. I mixed three parts of the Sherwin Williams Faux Impressions latex glaze with one part of the Sherwin Williams Naval paint in a satin sheen.
Make sure to roll an even coat onto the section; don’t be afraid to keep applying the glaze until it has consistent coverage. You will see the unevenness in the paint coverage if you don’t. I found rolling in one direction to work best. Take your wallpaper brush and brush side to side then vertically down, Heathered Nest has a good tutorial on this. I found that this wallpaper brush from Amazon worked the best.

After I completed all the panels on the wall, I had one section that was considerably lighter than the others. I decided that I would attempt to glaze over that section again to see if it would match the other sections better. As soon as I painted that section, it was completely different than the others, so I kept going and repainted it all. In the end, it turned out to be a happy mistake because the double technique turned out even better. To me, it looks like grasscloth wallpaper. I decided to stop at only the back wall behind the bed, verses the entire room.

DIY Basket Light Fixture
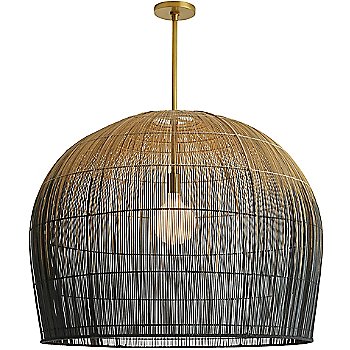
I loved the look of the inspiration pendant light, but not the price tag. I thought I would try and create a DIY version of the basket light.

All it takes to create a basket light is to gather the components; a light fixture and a basket. I have seen lots of DIYs that used a pendant light cord to create a basket light, but I wanted to give it a high-end look with a semi-flush rod stem instead. I found a light fixture at Menards that had the base I wanted, and I also knew the light fixture would work in the room if I didn’t end up liking the basket light. I found the basket at Home Goods.


I utilized the glass shade to mark the circle needed to create a hole in the bottom of the basket. We found it worked best to use a Dremel to cut the circle out of the bottom of the basket. Once you have a hole in the basket, it was as simple as replacing the glass shade with the basket and done. A DIY basket light for $88!

I am waiting to see once I get the rest of the room completed if I want to paint the basket or leave it as is. It is an accent light with the single bulb and basket cover; I would steer away from this idea if it is the room’s only source of light.
Follow along with the other participants in the Spring 2020 One Room Challenge by visiting the One Room Challenge Blog here.


[…] If you have missed anything in the guest bedroom transformation, get caught up here; Week 1 / Week 2 / Week 3 / Week 4 / Week 5-6. […]